LED Blinking with ESP32 DOIT DevKit v1 – Step-by-Step Tutorial

Introduction
The LED blink program is often called the “Hello World” of embedded systems. It’s the simplest way to test if your ESP32 is working properly and if you can control an output device.
In this tutorial, we will blink an external LED connected to GPIO 12 of the ESP32 DOIT DevKit v1. This will help you understand:
- How to use GPIO pins as outputs.
- How to control an LED using Arduino code.
- The basics of digitalWrite() and pinMode().
Components Required
- ESP32 DOIT DevKit v1
- 1 × LED (any color)
- 1 × Resistor (220Ω – 330Ω recommended)
- Breadboard and jumper wires
- USB cable
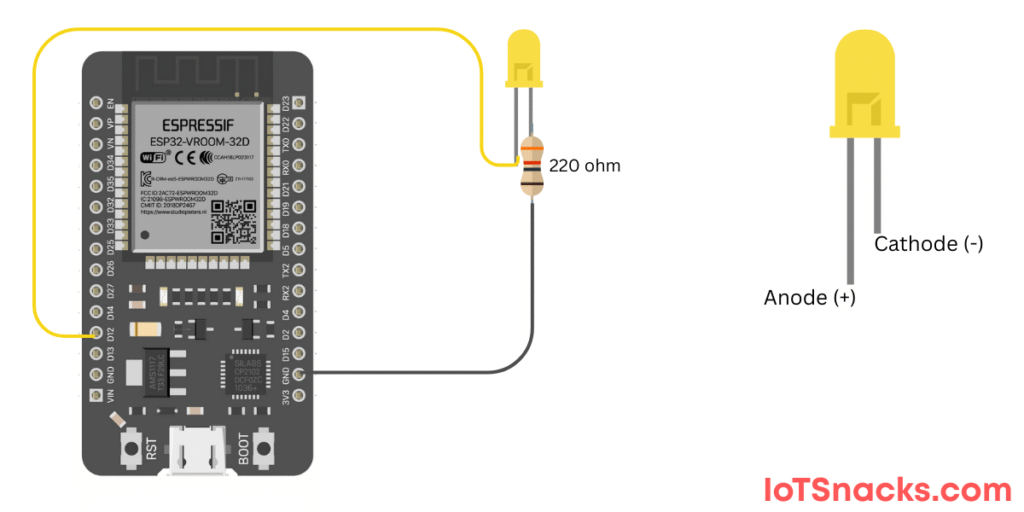
Circuit Diagram
- Connect LED anode (+, long leg) → GPIO 12 via a 220Ω resistor
- Connect LED cathode (-, short leg) → GND
⚡ Note: We use GPIO 12 because we already fixed it in our series pin mapping.
Arduino Code
// LED Blinking with ESP32 DOIT DevKit v1
int ledPin = 12;  // LED connected to GPIO 12

void setup() {
  pinMode(ledPin, OUTPUT);  // Set pin as OUTPUT
}

void loop() {
  digitalWrite(ledPin, HIGH);  // Turn LED ON
  delay(1000);                 // Wait 1 second
  digitalWrite(ledPin, LOW);   // Turn LED OFF
  delay(1000);                 // Wait 1 second
}
Step-by-Step Code Explanation
- Define LED Pin
int ledPin = 12;
We assign GPIO 12 to ledPin since our external LED is connected there.
Setup Function
pinMode(ledPin, OUTPUT);
This tells ESP32 that GPIO 12 will be used as an output pin.
Loop Function
digitalWrite(ledPin, HIGH);
delay(1000);
digitalWrite(ledPin, LOW);
delay(1000);
Turn LED ON → Wait 1 second
Turn LED OFF → Wait 1 second
Repeat forever
Output
- The LED will turn ON for 1 second and then turn OFF for 1 second, repeatedly.
- You can try changing the delay values to make the LED blink faster or slower.
Real-Life Applications
- Status Indicators (Power ON, Wi-Fi Connected, Error States).
- Debugging (use blink patterns to show sensor readings or system states).
- Notifications (blink LED when a message is received or sensor detects something).
Troubleshooting
| Problem | Cause | Solution |
|---|---|---|
| LED not blinking | Wrong wiring | Check LED polarity and resistor connection |
| Upload error | Wrong board/port selected | Select “DOIT ESP32 DEVKIT V1” in Arduino IDE |
| LED stays always ON | Pin set incorrectly | Double-check LED pin (GPIO 12) |
| Dim LED | No resistor / high resistor | Use 220Ω – 330Ω resistor for brightness |
Can I blink the onboard LED instead of an external one?
Yes. The onboard LED is connected to GPIO 2. Replace ledPin = 12 with ledPin = 2.
Q2: Can I control multiple LEDs with ESP32?
Yes. You can connect multiple LEDs to different GPIO pins and control them independently.
Why do we use a resistor with the LED?
The resistor limits current to prevent the LED from burning out.
How fast can ESP32 blink an LED?
ESP32 can blink LEDs very fast (microseconds), but the human eye can only see blinks slower than ~20ms.
Can I control LED brightness instead of just ON/OFF?
Yes. You can use PWM (analogWrite) on ESP32 to control brightness. We’ll cover that in a later tutorial.