DHT11 / DHT22 with ESP8266 (NodeMCU / Wemos D1 Mini)

Introduction
The DHT11 and DHT22 are widely used sensors to measure temperature and humidity.
- DHT11 → Cheaper, less accurate, works between 0–50°C, 20–80% RH.
- DHT22 → More accurate, wider range: -40–80°C, 0–100% RH.
In this tutorial, you’ll learn how to:
- Connect DHT11/DHT22 with ESP8266
- Read temperature and humidity values
- Print data on the Serial Monitor
Introduction
The DHT11 and DHT22 are widely used sensors to measure temperature and humidity.
- DHT11 → Cheaper, less accurate, works between 0–50°C, 20–80% RH.
- DHT22 → More accurate, wider range: -40–80°C, 0–100% RH.
In this tutorial, you’ll learn how to:
DHT11 vs DHT22 Comparison
| Feature | DHT11 | DHT22 (AM2302) |
|---|---|---|
| Temperature Range | 0°C to 50°C | -40°C to 80°C |
| Temperature Accuracy | ±2°C | ±0.5°C |
| Humidity Range | 20% to 80% RH | 0% to 100% RH |
| Humidity Accuracy | ±5% RH | ±2–3% RH |
| Sampling Rate | 1 reading per second (1 Hz) | 0.5 reading per second (0.5 Hz) |
| Resolution | 8-bit | 16-bit |
| Operating Voltage | 3.3V – 5V | 3.3V – 6V |
| Max Current | 2.5 mA | 2.5 mA |
| Data Format | Single-wire digital signal | Single-wire digital signal |
| Cost | Cheaper (low-cost sensor) | More expensive (higher accuracy) |
| Best Use Cases | Basic DIY projects, beginners | Weather stations, IoT, precision apps |
Components Required
- ESP8266 board (NodeMCU / Wemos D1 Mini)
- DHT11 or DHT22 sensor module
- Jumper wires and breadboard
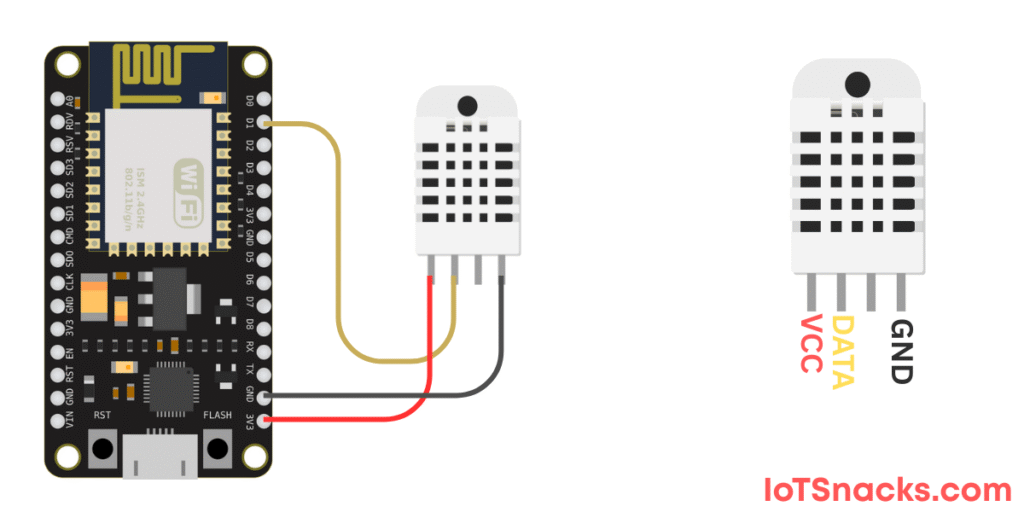
Circuit Diagram
Connections (using D1 for data):
- VCC → 3.3V
- GND → GND
- DATA → D1
👉 Some DHT modules have a built-in resistor; if not, use a 10kΩ pull-up resistor between DATA and VCC.
Installing the DHT Library
- Open Arduino IDE → Go to Sketch > Include Library > Manage Libraries.
- Search for “DHT sensor library” by Adafruit and install it.
- Also install “Adafruit Unified Sensor” library.
DHT11 / DHT22 with ESP8266
#include "DHT.h"

#define DHTPIN D1      // Pin where DHT is connected
#define DHTTYPE DHT22  // Change to DHT11 if using DHT11

DHT dht(DHTPIN, DHTTYPE);

void setup() {
  Serial.begin(115200);
  dht.begin();
  Serial.println("DHT Sensor Test");
}

void loop() {
  float humidity = dht.readHumidity();
  float temperature = dht.readTemperature(); // Celsius
  float temperatureF = dht.readTemperature(true); // Fahrenheit

  if (isnan(humidity) || isnan(temperature)) {
    Serial.println("Failed to read from DHT sensor!");
    return;
  }

  Serial.print("Humidity: ");
  Serial.print(humidity);
  Serial.print(" %\t");

  Serial.print("Temperature: ");
  Serial.print(temperature);
  Serial.print(" °C  ");
  Serial.print(temperatureF);
  Serial.println(" °F");

  delay(2000); // Read every 2 seconds
}
Step-by-Step Code Explanation
#include "DHT.h"→ Includes Adafruit’s DHT library.#define DHTPIN D4→ Defines GPIO pin where sensor is connected.#define DHTTYPE DHT22→ Defines sensor type (change toDHT11if using DHT11).DHT dht(DHTPIN, DHTTYPE);→ Creates sensor object.dht.begin();→ Initializes sensor.float humidity = dht.readHumidity();→ Reads humidity in %.float temperature = dht.readTemperature();→ Reads temperature in °C.float temperatureF = dht.readTemperature(true);→ Reads in °F.isnan()check ensures values are valid.- Results are printed every 2 seconds.
Output on Serial Monitor
Humidity: 55.2 %   Temperature: 27.3 °C  81.1 °F
Humidity: 54.8 %   Temperature: 27.5 °C  81.5 °F
Real-Life Applications
- Smart Home Automation (monitor indoor air quality)
- Weather Stations
- Greenhouse Monitoring
- IoT Cloud Dashboards (send data to ThingSpeak, Blynk, or MQTT)
Troubleshooting
- If readings show nan (Not a Number) → check wiring and resistor.
- Use short wires; DHT sensors are sensitive to noise.
- Try slowing down reading frequency (minimum 2 seconds delay).
Conclusion
You’ve learned how to:
✅ Connect DHT11/DHT22 with ESP8266
✅ Read temperature and humidity values
✅ Print results in Serial Monitor
This project is the foundation for IoT weather and smart agriculture projects 🚀.
What’s the difference between DHT11 and DHT22?
DHT11: Cheaper, less accurate, limited range.
DHT22: More accurate, wider range, slightly more expensive.
Can I power DHT from 5V with ESP8266?
Yes, but ensure the data pin is 3.3V compatible (use a logic level shifter if needed).
How often can I read values?
Every 2 seconds or more (faster reads may cause errors).