Buzzer with ESP8266 (NodeMCU/Wemos D1 Mini)

Introduction
Buzzers are small devices that produce sound. They are often used in alarms, timers, and notification systems. With ESP8266, you can control buzzers to create beeps, tones, and even simple melodies.
There are two types of buzzers:
- Active Buzzer → Produces sound when powered (just ON/OFF control).
- Passive Buzzer → Needs PWM signal to generate tones of different frequencies.
👉 In this tutorial, we’ll cover both.
Components Required
- ESP8266 board (NodeMCU or Wemos D1 Mini)
- 1 x Active or Passive Buzzer
- 1 x 220Ω resistor (optional for limiting current)
- Breadboard and jumper wires
Circuit Diagram
Text description (for D5 / GPIO14):
- Buzzer + pin → D5 (GPIO14)
- Buzzer – pin → GND
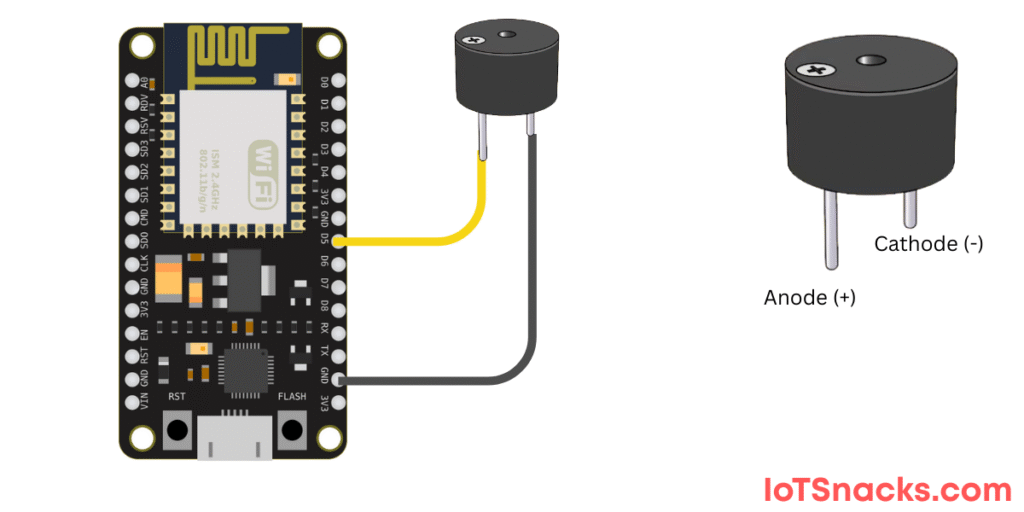
(If using a passive buzzer, resistor may be used in series for safety.)
Active Buzzer (Simple Beep)
// Active Buzzer with ESP8266
int buzzerPin = D5;  // GPIO14

void setup() {
  pinMode(buzzerPin, OUTPUT);
}

void loop() {
  digitalWrite(buzzerPin, HIGH); // Buzzer ON
  delay(1000);                   // Wait 1 second
  digitalWrite(buzzerPin, LOW);  // Buzzer OFF
  delay(1000);                   // Wait 1 second
}
Step-by-Step Explanation
- Define buzzer pin → D5 (GPIO14).
- pinMode(buzzerPin, OUTPUT) → Set as output.
- digitalWrite(HIGH/LOW) → Turns buzzer ON/OFF.
🔊 Buzzer beeps once every second.
Passive Buzzer (Tone Generation)
For a passive buzzer, we use PWM to generate sound frequencies.
// Passive Buzzer with ESP8266
int buzzerPin = D5;  // GPIO14

void setup() {
  pinMode(buzzerPin, OUTPUT);
}

void loop() {
  tone(buzzerPin, 1000);  // Play 1kHz tone
  delay(1000);
  noTone(buzzerPin);      // Stop sound
  delay(1000);
}
Step-by-Step Explanation
- tone(buzzerPin, 1000); → Generates a 1000 Hz sound.
- delay(1000); → Keeps it ON for 1 second.
- noTone(buzzerPin); → Stops the buzzer.
🔊 Buzzer plays a 1-second tone, then stays silent for 1 second.
Simple Melody on Passive Buzzer
// Simple melody using ESP8266 and passive buzzer

int buzzerPin = D5;

int melody[] = {262, 294, 330, 349, 392, 440, 494}; // Notes C, D, E, F, G, A, B

void setup() {}

void loop() {
  for (int i = 0; i < 7; i++) {
    tone(buzzerPin, melody[i]);  // Play note
    delay(500);                  // Duration
    noTone(buzzerPin);           // Stop note
    delay(100);
  }
}
🔊 Plays a sequence of musical notes (C to B).
Real-Life Applications
- Alarms & Security Systems (buzzer rings on motion detection)
- Notification Systems (alert when task complete)
- Smart Home Devices (doorbell, reminder buzzer)
- Games & Toys (sound effects)
Troubleshooting
- If no sound → Check if your buzzer is active or passive.
- If tone() doesn’t work → You might have an active buzzer, which only supports ON/OFF.
- If sound is too weak → Use a small transistor driver circuit for louder buzzers.
Conclusion
You now know how to use a buzzer with ESP8266:
- Control an active buzzer with ON/OFF signals.
- Generate tones and melodies with a passive buzzer.
- Apply it in alarms, smart devices, and IoT alerts.
This is a great foundation for projects like fire alarms, smart doorbells, or IoT notifications. 🚀
Can I connect the buzzer directly to ESP8266 GPIO?
Yes, for small buzzers. For larger ones, use a transistor driver.
What’s the difference between active and passive buzzers?
Active buzzers beep when powered. Passive buzzers need a PWM frequency signal.
Can I control buzzer sound from a web server on ESP8266?
Yes, you can integrate this with a web page or MQTT for remote alerts.